Blog Archive

The Best Card Game Recommendations for Kids

Friday Game Day is very popular in our house. Instead of engaging in our usual learning routines, we pull out a board game or card game to enjoy.

Playing games can teach so many important lessons. Even though the kids think they're not learning, they really are.

It is a well known fact that I am not a fan of board games as much as I am card games. When it's my turn to choose, everyone knows we're going to be playing cards.

Today I thought I'd share the best card game recommendations for kids in my opinion.


The Best Card Game Recommendations for Kids


The Best Card Game Recommendations for Kids


Our kids are introduced to card games when they're young and when they show interest in playing games with the family.

We always try to start out with the easiest options to ensure the experience is as positive as it can be. Mind you there's always a chance of issues when it comes to losing a game.

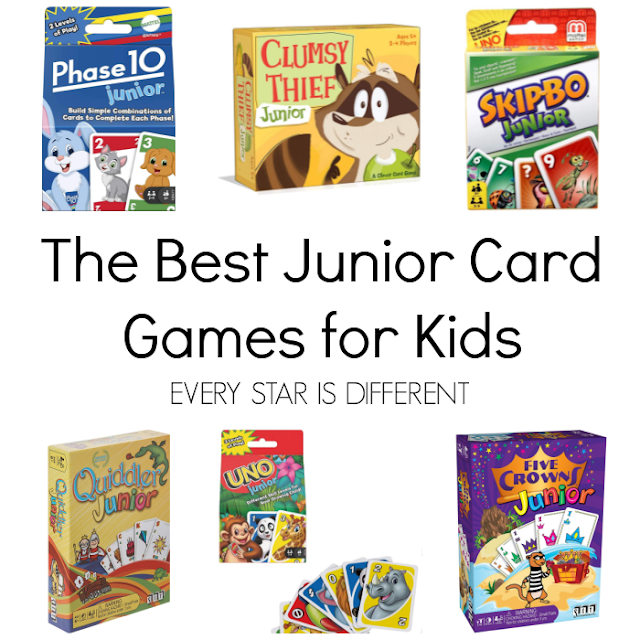
The Best Junior Card Games for Kids

Depending on what type of junior card game you're into, there's sure to be something that meets your needs and styles.


The Best Junior Card Games for Kids


These are our absolute favorites. Sunshine still needs some assistance with a couple of them, but the rest she's really great at.

Skip-Bo Junior Sequencing

Phase 10 Junior

Five Crowns Junior

Quiddler Junior

Clumsy Thief Junior

Uno Junior


All of our kids have found that junior card games can be just as fun as versions for older kids when the whole family can join in the fun successfully.


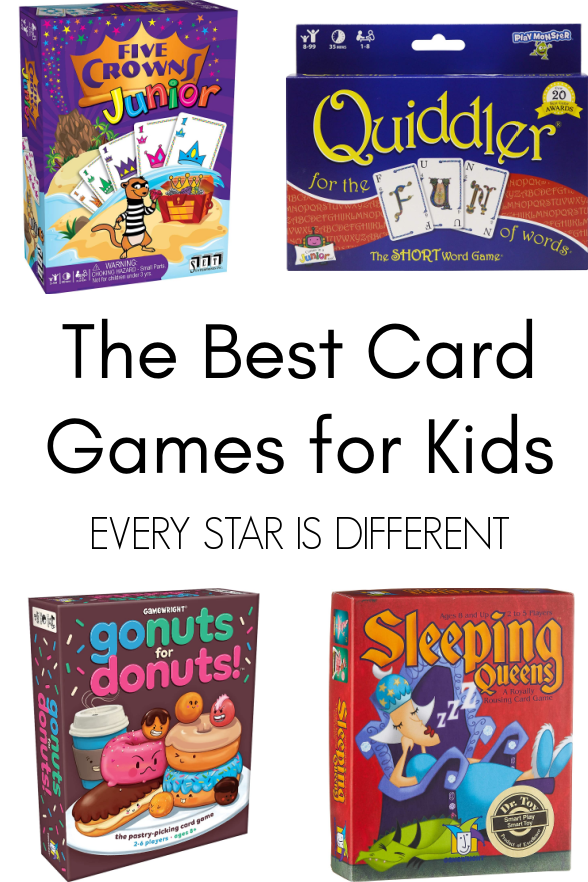
The Best Card Games for Children Ages 5-10


Once the kids graduate from our favorite junior card games, the move on to four others.


These games have withstood the test of time. Every single kiddo in the house has loved them!


The Best Card Games for Children Ages 5-10

These games range from a starting age of five to eight years old, but have been played by all our kids within that age frame and beyond.


Guess Who?

Sleeping Queens

Go Nuts for Donuts

Infinity Gauntlet: A Love Letter Card Game


Now that three of our kids are older, they love a challenge and a lot of fun as they play card games. 


The Best Card Games for Preteens and Teens


We've tried and tested a lot of card games over the years with our preteens and teens. These are still our favorites and the most worn from use. Lol.


The Best Card Games for Preteens & Teens


Please note that this list does not include our favorite Harry Potter themed card games. For those you need to click HERE.

But this list does include all the rest!


Five Crowns

Quiddler

Rack-O

Spin Doctor


We hope this list gives you a few new games to try and fall in love with. 

Card games are perfect for so many occasions at home, on the road, and more!

Be sure to sign up for our FREE newsletter to receive more ideas and recommendations for family fun!


Click HERE to Subscribe to our FREE Newsletter


If you enjoyed this post, you may also enjoy the resources below.


How to Help Your Autistic Child Play Board Games Successfully Disney Villians Halloween Party The Best Harry Potter Themed Gifts How We Do Montessori Middle School at Home 24 Fun Family Physical Fitness Ideas A Minimalist Living Room

The Best Card Games for Kids


Read More »

One Sure Way to Improve Couples Communication with ADHD & Autism

 "Stop interrupting me!"

"Would you let me finish my sentence please?"

"If you didn't interrupt me when I was speaking, then you'd know how I feel."

These became common phrases my husband and I would say to one another as we were trying to have serious and/or sensitive conversations.

Conversations became arguments, and well...

Neither of us were our best selves.

That is until we implemented One Sure Way to Improve Couples Communication with ADHD & Autism.


One Sure Way to Improve Couples Communication with ADHD & Autism


Jason struggles with pausing before speaking in conversations and interrupts often.

His ADHD, autism, and other mental health issues impact his ability to communicate in multiple ways.

Think impulsivity, executive functioning issues, struggles with strong emotions, and so much more.

This does not mean that he's bad or wrong. It just means that conversations can be challenging.

When he speaks he tends to speak for a long time going round and round, and I lose track of his main points.

I become frustrated because I never get a chance to speak and get confused trying to keep up with all of the twists and turns of what he's saying. 

This results in me interrupting him just to get a word in edge wise, before I forget the main point.

Obviously, the situation worsens.

As you might guess, this is a recipe for disaster.

Both of us needed help when it came to communicating with each other effectively.

After having three children with ADHD and autism, when there's an issue in our house, my brain automatically goes to problem solving mode.

What supports can I put in place to help the child be successful?

Because our communication struggles were impacting us in big ways, my brain decided to do the same thing with my husband.

What supports could I put in place to help him?

That's when the idea hit me.

What if we used a timer?

What if we set a timer for five to ten minutes, while one of us spoke? 

The other could take notes on a piece of paper to address on their turn.

Would that help?

My instant gut reaction was that it would help, but this was something that both my husband and I had to agree to try. So, I asked him about it.  

At first he was a bit nervous and felt a little uncomfortable, but eventually went along with it.

Sure enough it worked!

I am so thankful he was willing to try.


Couples Communication with ADHD & Autism


Our conversations may last anywhere from 10 minutes to hours, depending on the subject, but there are no longer interruptions, harsh words, or either of us feeling like we're not heard.

The timer provides Jason with a visual cue to pause. The pen and paper give him a chance to write down feelings, emotions, thoughts, and questions, as I'm speaking in a safe way.

By the time he starts speaking he's able to communicate more effectively and calmly.

I feel heard, which feels amazing.

The paper and pencil also help me to keep track of the main points of what Jason is saying, even when he takes a full ten minutes to express his thoughts and he jumps from topic to topic.

We've been using the timer during serious conversations for about six months now. I don't think we'll ever go back.

The timer has made that much of a difference for us.

Over time, because of the timer, we've also been able to discover and communicate what we need from each other in regards to knowing that we're listening.

Jason loves for me to start my turn speaking by recapping what he said, or at least the main points in a couple of sentences. I now can do this because I'm able to keep track!

He feels validated when I do this.

I, on the other hand, appreciate when he's able to comment positively about something I've said or how I've said it.

When he starts with a compliment, I know we're in a safe space to talk about big feelings and he'll be okay.

The timer may not be the solution for everyone, but it can help so many.

In order for it to work at all, both parties have to agree.

Whether you or your partner have ADHD or autism or neither, this may just may be the perfect solution for you!

Psst! It also works with your kids, especially teenagers.

For those who would like more couples resources related to autism and ADHD and would like to follow our story, be sure to subscribe to our FREE newsletter.


Click HERE to Subscribe to our FREE Newsletter


If you enjoyed this post, you may also enjoy the resources below.


Overcoming Struggles with Autism I Think My Husband Has Autism It's Time to Have a Serious Talk About Autism Morning and Bedtime Routine Visuals and Supports Chores and Practical Life Visuals and Supports Outdoor Visuals and Supports

One Sure Way to Improve Couples Communication with ADHD & Autism


Read More »

Breathing Exercises for Kids with FREE Printable

When Sunshine is feeling strong feelings, taking deep breaths helps her to not aggress or engage in negative behaviors in the moment.

However, she does often find breathing boring and complains that it doesn't seem to help with the actual emotion behind the behaviors that she's feeling at the time. 

That was the case, until we introduced the breathing exercises for kids mentioned in this post.

Sunshine absolutely LOVES them. They seem to work every time, so long as her brain isn't too activated.

I created a free printable to go along with the breathing exercises so that no matter where we go, we can bring the visuals to cue Sunshine when they are needed. For her, the visual is everything.

Breathing Exercises for Kids with FREE Printable

Confession time.

I can not take any credit for these breathing exercises. Full credit goes to Kira Willey, author of Breathe Like a Bear, and her amazing illustrator Anni Bets.

Breathe Like a Bear Book


Kira Willey wrote a magnificent book full of 30 different breathing activities that help children to calm, focus, imagine, energize, and relax.  (We do not use the energize activities with Sunshine as they activate her brain too much.)

Our entire family LOVES this book because it takes deep breathing to the next level, helping children visualize and engage with their mind and body in positive ways that not only help with behaviors, but also the emotions behind them.

Breathe Like a Bear

How doe Kira Willey do this you ask?

Each breathing exercise comes with a story and visualization. The exercise takes the child out of current circumstances and transplants them into another that is positive and enjoyable. 

For Sunshine, this is HUGE. 

Her brain deactivates. 

Instead of going to a dark place in her mind while she takes simple deep breathes, she visualizes the breathing exercises and goes to a happy place.

Once the result of the breathing exercise has been reached, she is able to talk about her emotions calmly and safely.

We absolutely LOVE the book, Breathe Like a Bear.

Breathe Like a Bear Cue Cards


Now, I've shared all of the pros of this book, but I must confess there is one con.

This book does not fit in my purse and is really hard to carry around to other places outside of the home!

When I wrote this post the author had not created portable cards to carry around to use in all settings. 

Fortunately, cards are now available!

Breathe Like a Bear Cue Cards

These 50 Breathe Like a Bear Mindfulness Cards include the beautiful illustrations and instructions for each breathing activity included in her book and more!

 Before these cards were create, I made my own Breathe Like a Bear Cue Cards that I would slip into my purse or my youngest daughter's backpack on the go. 


FREE Breathe Like a Bear Cue Cards for Kids


Now let me clarify what these cards are and aren't.


  • These cards do NOT include instructions and stories written by Kira Willey related to the breathing exercises found in the Breathe Like a Bear book.
  • These cards do NOT include the beautiful illustrations created by Anni Betts, nor claim to be anything like them.
  • These cards do NOT replace the incredible effort that Kira Willey and Anni Betts put into their masterpiece.
  • These cards do NOT work without having full details of the breathing activities in the book, Breathe Like a Bear
  • These cards DO give true-to-life visuals that represent breathing activities listed in the book, with a title and a one word description of what type of breathing activity each card represents.
  • Those who choose to use these cards DO need to purchase the book in order to understand what any of the titles and exercises are.
  • These cards DO allow me to provide Sunshine with visuals for the breathing activities in the book, Breathe Like a Bear, when we are on the go and I'm unable to transport the book, but only after we've used the book to practice and memorize all that's necessary to remember while using the cards.
  • These cards are for personal use only.

How We Use the Breathe Like a Bear Cue Cards


Option 1:


These cards were created two years ago when we thought that Sunshine would be returning home to us sooner than later.


Before her last hospitalization we read through the book together and had her choose one to two breathing activities that she liked most. 


After practicing the breathing activities when she was calm to ensure that she had mastered them, I would initiate their use when emotions were high.


The goal was to have Sunshine eventually initiate them, choosing one or two a day to use when necessary.


Selecting her breathing cards for the day would be part of her initial check-in of the day.


These exercises worked every time, when Sunshine's brain wasn't too activated.


Option 2:


 Big emotions are not just something that happens at home. These cards are perfect for carrying in my purse when I don't have the book on hand to use.


When we prepare to leave, Sunshine will pick one or two breathing exercise cue cards to bring along if necessary. That way when she struggles, she has something tangible and visual to remind her of what to do.


If you do not own the book, Breathe Like a Bear, I HIGHLY recommend it. Though it's designed for children ages 4-8, I love it as an adult!


Finding the breathing techniques that work for your child specifically is so important. Understanding that every child is different is crucial to success.


Directions on How to Obtain Subscriber Only Freebies

1. Click on the Subscriber's link at the bottom of this post.

2. Subscribe to our free newsletter.

3. Open the thank you message you receive in your e-mail, after subscribing. (Be sure to check your spam folder, as sometimes it ends up there.)

4. Click the confirmation link in the thank you message.

5. Once the confirmation is complete, you will receive another e-mail message with the Subscriber Only Freebies.

6. Click on link.

7. Find the printable pack you are looking for listed in alphabetical order, click on it, and voila!

We hope you enjoy your free printable.

Note: If you are already a newsletter subscriber, open your most recent newsletter. At the bottom you will find a link to the Subscriber Only Freebies page, along with the password in case you forgot it.


If you enjoyed this post, you may also enjoy the resources below. 


4 Steps to Managing Aggressive Behaviors Four Prompts to Encourage Mindfulness in ChildrenOne Sure Way to Help Your Child Work Through Emotions How to Create and Use an Individualized Emotional Regulation Chart Anger Management for Kids Morning and Bedtime Routine Visuals and Supports
Read More »

How to Create and Use an Emotional Regulation Chart

 It's no secret that Sunshine REALLY struggles with emotional regulation and anger management. 

One of the biggest challenges we have when others care for Sunshine is that they do not understand what Sunshine's behaviors mean.
 
When caregivers miss important emotional regulation cues,  everyone suffers. 

Instead of working on prevention and regulation strategies, caregivers end up focusing on behavior strategies.

This is why it's so important to teach emotional regulation in ways that a child can understand. 

Today I'm going to show you how to create and use an emotional regulation chart for your child!


How to Create and Use an Emotional Regulation Chart


Emotional regulation is something that we've always worked on at home in various ways. It was super easy when Sunshine was home all the time.


But when she started attending a day program emotional regulation was not a focus in the classroom. Sunshine suffered because of this.


After some great meetings with her team, they introduced a color based emotional regulation program and chart at school. We carried over what was being taught at home, adding on to what we were already doing.


The program used at school introduced green representing the emotion happy. Blue stood for sick and/or sad. Yellow stood for emotions like anxious, nervous, scared, etc. Red stood for angry.


The concepts taught in the program at school were great, but based on Sunshine's struggles with brain activation, we realized we needed to add another emotion option to her chart, which we call "fire red." 


Sunshine reaches "fire red" when her brain is activated to the point of having a behavioral seizure. During this time, behaviors do not stop until the seizure is finished. Most often these behaviors include hurting others and sometimes Sunshine hurting herself.


The goal with Sunshine is to always keep her as calm as possible. As she identifies what color she's on at check-ins throughout her day, the goal is return to green as quickly as possible through using various coping skills.

Using a chart with colors and corresponding emotions is a huge help! It's the perfect visual for kids.

How to Create an Individualized Emotional Regulation Chart


1. Identify target emotions and assign color to them.


When creating an emotional regulation chart, you do not need to use the same colors and emotions introduced by Sunshine's school. You can choose any colors and emotions you'd like based on observations of what your child will respond most positively to.

If you're enlisting the help of your child when creating a chart, have them pick their own colors and match them to emotions.

For us, the colors introduced at school transformed into multiple emotions based on observation and identification.

2. Choose a way to represent emotions that match colors.


I chose to use emojis to represent corresponding emotions in our chart because Sunshine LOVES emojis and still can't read.

If you choose to create a chart similar to mine, it's super easy to purchase emoji stickers and use them.

Other options you may consider are drawings, photographs of the your child in different emotional states, or simply writing out the emotions depending on your child's age.

Whatever your choose is completely up to you! 

If it's possible, and your child is willing, they could participate in this process. 

3. Create a three column chart.


The first column is for colors. Next comes corresponding emotions. Last is a check in space is available for the child to use when possible.

4. Place color markers and corresponding emotions in the appropriate places on the chart.


This is the fun part where everything comes together!

Children may enjoy putting their chart together using glue, stickers, markers, crayons, or whatever you choose to use.

I created ours on the computer since Sunshine isn't at home right now. This way it can be printed out and used in multiple settings. 

When she does come home, I'm excited for her to create her own.

This is Sunshine's chart!

Sunshine's Emotional Regulation Chart

This chart was created by me and is designed specifically for Sunshine. It is not available for use by anyone else for free or through purchase.


Please know it's okay if each color has only one corresponding emotion. 

Sunshine's chart is based on her ability to recognize different emotions. If your child isn't able to recognize more than five simple emotions, only include those.

5. Decide how your child will do an emotional check-in.


The third column is a place where the child does a check-in about how they're feeling. It can be used in various ways.

Your child can draw the emotion their feeling in the proper box.

Your child can use a clothespin and clip it to the correct box.

Your child can draw a check mark in the correct space.

In all honesty, the sky is the limit!

Whichever way you choose to use the last column, be sure to use cardstock and/or laminate your chart for durability. 

I will be asking Sunshine to use white board markers to draw the correct emoji face when possible at home.

6. Make a list of emotions and corresponding behaviors.


DO NOT SKIP THIS STEP!  

It is one thing to teach your child how to identify their emotions by color, but a completely different to identify emotions by behaviors, which is the whole point of creating the emotional regulation chart in the first place.

Take time to observe your child.

Observe the child's behaviors and emotions.

Ask questions based on your observations. 

"I am observing that when you are feeling nervous when playing, you are unkind to your friends. Is this correct?"

Obviously you will modify questions based on what the child can understand and answer.

Write down behaviors that you can associate with emotions. 

This is your guide to helping your child understand emotional regulation.

Sunshine's list is below. I use colors rather than emotions to make it easier.
Sunshine's Emotional Regulation Colors & Corresponding Behaviors

Once you have your list, use it!

When using the emotional regulation chart, the goal is to teach your child how they feel and what behaviors they display when they have that feeling.

From there they can learn to identify the emotion and behaviors themselves and decide to change them to those that are more positive.

We have handed this list out to Sunshine's day program, respite workers, and every RTC team she has had. When they choose to use it, it makes such a difference.

Adults are able to catch Sunshine before she escalates too far and activates her brain.

Over time the goal is to teach Sunshine to catch herself before she activates, after lots of practice and constant use of the chart, associating behaviors with emotions the entire way.

It may take a LONG time, but I do believe it's possible!

Be sure to subscribe to our FREE newsletter if you'd like to receive more support and resources related to emotional regulation, 


If you enjoyed this post, you may also enjoy the resources below.

Anger Management for Kids Four Prompts to Encourage Mindfulness in Children 4 Steps to Managing Aggressive Behaviors One Sure Way to Help Your Child Work Through Emotions 5 Lessons to Teach Kids About Balancing Emotions Fun Ways to Teach Children About Emotions
Read More »

How We Do Montessori Middle School at Home

This year we have made the transition from a Montessori elementary focused homeschool experience to one that is Montessori middle school focused. 

I won't lie. The transition has been a work in progress and has taken most of the school year. 

We started this journey in September. Now, in March the kids are finally settling into it and are enjoying most moments.

Instead of transitioning to a Montessori-inspired middle school model all at once, we've introduced it piece by piece over the school year.

I did this to prevent unnecessary meltdowns and negative behaviors. 

I am so excited to finally share the many phases of this transition and how we do Montessori middle school in our homeschool environment.

How We Do Montessori Middle School at Home

How Do I Know it's Time to Switch to a Montessori Middle School Approach to Learning?


At the beginning of the school year, my three older children were ages 12,13, and 14 and documented by our school district as being in grades six, seven, and eight.

Dinomite, 14, and Bulldozer, 13, are autistic and have developmental delays as well as academic delays in the areas of math and writing. On average they're about two to three years behind their peers.

Princess, 12, who suffers from Reactive Attachment Disorder, is quite advanced in academics, but struggles with emotional development.

As a result, all three are learning the same things at the same time, at about the same pace.

Due to the three kids' interests, learning preferences, and the concept of following their lead, we are still working on some Montessori elementary curriculum, especially in the areas of language and math. 

But, what I've noticed this year, is that the kids prefer learning using paper and pencil, over the use of Montessori materials and printables.

They are craving research and showing an interest in writing assignments that are larger in nature.

Emotionally they are at a place where they can handle homework, studying, and preparing for tests. In fact, they've requested these things. 

I love their new desire to practice and master a skill over an extended period of time. Their piano and foreign language skills are blossoming this year.

For us, the transition to Montessori Middle School wasn't about the curriculum and checking off boxes in regards to what the kids had learned. It was about HOW the kids' preferred learning styles were changing.

This change in learning style is directly related to brain development and the planes that Maria Montessori speaks about.

How Do I Change the Learning Environment to Accommodate Montessori Middle School Learning?


I must admit, the hardest aspect of transitioning to a Montessori-inspire middles school environment for me was changing my classroom set up.

I LOVED the Montessori preschool classroom with all of the beautiful and attractive work set up on trays for the kids to choose from. 

I LOVED preparing the trays!

When we transitioned to an elementary set up, I learned to love the bigger materials and bigger work.

Instead of using trays and baskets for individual activities, they were used to store printables that went along with materials.

In both preschool and elementary settings, I was still able to set up an area of the classroom for each subject.

But the transition to middle school...

There are no more trays or baskets, except for those that hold paper for writing.

There is no longer a set of shelves for each subject. 

Instead, the kids use one shelf for each subject they're studying, where they store their notebooks, textbooks, workbooks, reference materials, and necessary tools like calculators, protractors, rulers, etc.

The rest of the classroom has turned into my office and storage for important papers.

If the kids had desks, notebooks, textbooks, workbooks and tools would be stored there, leaving only references for each subject on the shelves. But, they still very much enjoy working wherever they'd like in the house, and have opted to use the shelves to store items.

We all use dry erase lapboards when learning a new skill and for practice.

How Do I Create Middle School Routines and Schedules?


Settling into a new routine and schedule definitely took time when transitioning into Montessori-inspired middle school learning.

Based on the kids' skills, abilities, and needs we have created a routine and schedule that works for us. This may not be a set up that works for you, and that's okay.

Lessons


Monday through Friday, we begin with math and language, reviewing assignments and progressing through lessons. 

The kids receive math and language homework four days a week.

Lessons go at the kids' pace. Some new concepts take only a day to master. Others can take a week or two. 

When everyone feels comfortable understanding concepts and any processes that are necessary to solving problems, we move forward.

After math and language lessons, we rotate through other subject areas. We follow an eight day schedule. Each day of the eight day schedule is dedicated to a different subject. The eight day schedule is followed Monday through Thursday.

The kids have selected which topics they'd like to study for the school year, outside of the basic subject areas.

  • Day 1: Geography
  • Day 2: Human Anatomy
  • Day 3: Art
  • Day 4: Foreign Language
  • Day 5: Oceanography
  • Day 6: Practical Life
  • Day 7: Music
  • Day 8: History

If it's Day 4 of our schedule, I present a foreign language lesson, review any assignment that was given, and check in to see where the kids are at, and if they need extra support.

At the end of the review and lesson, the kids are given an assignment to complete by the next Day 4 in the schedule. 

The kids are also given daily practice assignments. 

On foreign language days, they may receive a new vocabulary list or a set of verbs to practice until the next scheduled foreign language day.

Their favorite foreign language assignment is to watch a full movie in their foreign language, writing down ten new vocabulary words or phrases and meanings to share when we next meet.

Disney+ is such a fantastic resource to find movies in Spanish, French and German with matching subtitles. 

The kids watch a new movie every week, because they love this assignment so much. 

Their ability to read and pronounce words in their selected foreign language is skyrocketing.

Work Time


Lessons for the day usually take about 60-90 minutes. The kids are then given work time where they have a choice of working on any assignments they feel they may need help on.

I am available during that time to answer any questions or provide any extra support that may be needed.

Rough drafts of essays are reviewed. 

Art projects are underway. 

The computer may be occupied with one of the kids typing a final draft of a paper.

If someone is struggling in math, that kid may take that time to ask for help.

The kitchen may smell of fresh ingredients being used in the preparation of lunch.

Nature observations may be underway.

On days when everyone needs help, I set a timer for each child, giving them 20-30 minutes.

Work time lasts between 90 minutes and 2 hours, and takes us to lunch time, where we continue our read aloud tradition.

Homework


After the lunch, the kids are free to create their afternoon and evening schedule to ensure that all homework assignments and daily practice tasks are complete.

Each day the kids are required to complete 30 minutes of cardio exercise. They usually choose to play sports outside or ride my exercise bike.

All three kids are also required to practice piano for 30 minutes each day to prepare for their lessons on the music day of our schedule.

Other tasks include studying, math and language homework, essays, and projects they're working on.

The kids choose what and when they work on these things, knowing when they are due. 

During homework time, I am not available to help. They are to complete assignments on their own or ask a peer for help.

Homework time, including exercise and piano, usually takes anywhere from 2 to 3 hours, give or take.

The goal of homework time is to encourage as much independence as possible in the areas of time management, effective study methods, and responsibility of assignments.

In our home, we have a designated media time from 6 PM until 8 PM where the kids can use any and all of their media devices, watch TV, etc. All of them finish their homework, eat dinner, do chores, and shower before media time begins, creating their own schedule for the afternoon based on their individual needs.

Friday Game Day


As mentioned previously, Monday through Thursday, we follow our eight day schedule. On Fridays, we take a break and dedicate time to playing a board game or card game together during work time.

We have found that Game Day is just as important as any other day in the week. So much learning takes place on Game Day.

The kid work on communication skills, emotional regulation, problem solving, strategizing, working as a team (when playing cooperative games), positive peer interactions, and so much more.

We take turns picking out a game. A new person selects a game each week. 

Even the process of playing a game that's not a favorite, because someone else has chosen it, is teaching the kids so much about compromise.

I think my favorite part about Game Day is that Fridays are always a day the kids look forward to. They may think it's just about fun, but they're actually working harder on Fridays than some other days during the week.  Lol.

How Do I Incorporate Service into a World with COVID-19 and Other Extenuating Circumstances


Part of the Montessori middle school curriculum is service. This was the last piece of the middle school experience that we've added.

Due to COVID-19 and Sunshine's monthly visits and appointments, it's been difficult to secure a place for continued service over an extended period of time.

Instead, we have set the goal of completing one service project a week. The kids come up with the plans. They prepare. Then they execute the task.

I love that they are focusing so much on helping others and starting to develop skills necessary to secure employment in the future.

How Do I Continue to Inspire a Love of Learning through the Middle School Years


The transition to homework, tests, and grades can be a difficult, but it is necessary in preparation for higher education and employment. 

Learning time management, prioritization and organization skills can be a huge challenge for some. 

The sooner we can start teaching these skills, once the child is emotionally and developmentally able to handle the tasks, the better the results will be.

The challenge is keeping the focus on the process and not the results. It's not about the test grade. It's about preparing and being ready for the test.

So how do you balance all of the necessary and still make things fun?

You continue to follow the child!

You go at the child's pace.

You allow freedom to choose course work in areas where it is possible.

You introduce topics, and wait for further interest before pursuing them.

You offer choices in learning and how to demonstrate mastery of a skill.

Every child is different. 

This idea does not change once a child reaches puberty and embarks on their middle school journey.

If anything, middle schoolers need even more support than elementary students, due to the massive changes their bodies and hormones are going through.

Despite these changes, middle schoolers are capable of so many incredible things! 

Sit back. Relax. And enjoy the ride!

Now that we have fully transitioned to this model I am LOVING it!

If you would like to read what others have to say about Montessori Middle School, check out the articles below.


To follow our own personal Montessori Middle School journey, be sure to subscribe to our FREE newsletter.


If you enjoyed this post, you may also enjoy the following resources below.

Gingerbread Christmas STEM Projects American History for Kids: The Montessori Way A Year's Worth of Monthly Service Projects for Families 12 Months of Family Service Projects Best Tips for Montessori Homeschooling The Ultimate Montessori Planner

Read More »